sexta-feira, 1 de dezembro de 2023

DIANA-SPANISH


Este tutorial es de Manyi a quien agradezco por permitirme traducir sus tutoriales.

Original Aqui

*

El autor utilizó la PSP 2020 para realizar este tutorial.

La PSP X9 se utilizó en la traducción.

*

Complementos:

Complementos G'MIC-QT: download

Mehdi / clasificación de azulejos

*

Material:


>Todo el material fue creado por el autor.

*

Colores utilizados en el tutorial original:


*


MAPA 


*

Si no tiene el complemento G'MIC-QT, puede descargarlo haciendo clic en el enlace de arriba en la lista de complementos.


*

Haga clic en las imágenes para ampliar el tamaño y mejorar la vista. También puedes copiar la imagen y abrirla en PSP.

*

01. Abre una nueva imagen con 800 x 500px.

Pinta con este degradado:

(lineal /45/3/invertir sin marcar)


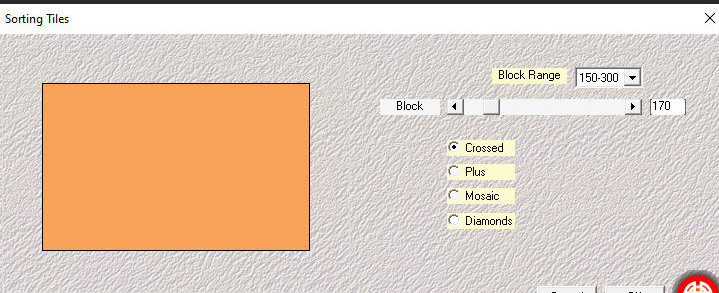
02. Efectos / Complementos / Mehdi / sorting tiles


03. Ajustar / Añadir/Eliminar Ruido / Añadir Ruido


04. Copia el tubo [viragom] y pégalo como una nueva capa.
No hay necesidad de moverse

05. Efectos / Complementos / G'MIC-QT /testing / Joan Rake / Deformations / Kaleidoscope Layer Cake


06. Capas/Duplicar

07. Activar la capa original - Raster 2
Efectos / complementos / G'MIC-QT /Patterns / Hearts


08. Efectos / Efectos de imagen / Mosaico integrado - predeterminado


09. Capas/Duplicar

10. Efectos/Efectos de imagen/Mosaico integrado

11. Fusionarse hacia abajo
Sombra: 1 1 80 1 negro

12. Fusionar visible

13. Pon el color #e14d4c en primer plano.
Efectos / Complementos / G'MIC-QT / Frames / Frame(painting)
guardar la imagen


14. Abra la imagen guardada y continúe editándola.
Selecciones / seleccionar todo
Imagen / agregar bordes / marcado simétrico / 40 px / color de primer plano

15. Selecciones/Invertir
Efectos / Efectos de imagen / Plegado de esquina


16. Continuar en la capa.
Repetir Plegado de esquina con esta nueva configuración


17. Selecciones / Promocionar selección a capa
No seleccionar ninguno

18. Seleccione las partes de la imagen que se muestran en la impresión, con la Varita Mágica configurada como se muestra en la impresión, en la parte superior


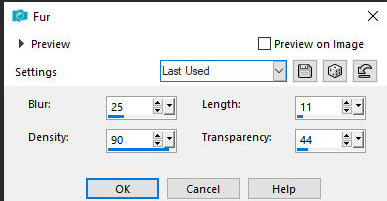
19. Efectos / Efectos de textura / Pelo


20. Selecciones / Invertir
Efectos/Efectos de textura/pelo nuevamente - misma configuración


21. No seleccionar ninguno
Copia el  tubo[lánykám] y pégalo como una nueva capa
Posición en el lado derecho según el modelo.

22.Ajustar/nitidez/Enfocar
Sombra: 0 0 50 36 negro

23. Copia el tubo deco[díszem] y pégalo como una nueva capa.
Posición según el modelo.

24. Fusionar todo
Efectos / Complementos / G'MIC-QT / frames / Frame (painting) / color=#e14d4c
guardar la imagen


25. Abra la imagen guardada y continúe editándola.
Capas/duplicar
Imagen / Espejo / Espejo Horizontal

26. Imagen/Cambiar tamaño: 25% - todas las capas sin marcar
Efectos / Complementos / Mura's Meister / Copies


  27. Active la herramienta Seleccionar y configure: X=68 / y=126


28. Ajustar / nitidez / enfocar más
pon tu firma

29. Imagen / agregar bordes / Marcado simétrico / 2px / color #4b191a
Imagen / Cambiar tamaño: 900 x 615 px - todas las capas marcadas
guardar como jpeg

*

Gracias por hacer mi traducción.
Me encantaría recibir una copia de tu versión para ponerla en mi foto.
Mi correo electrónico: correo electrónico

*

Tutorial traducido por Vera Mendes
No altere ni vuelva a publicar sin autorización del autor.
01/12/2023


DIANA-ENGLISH


This tutorial is from Manyi who I thank for allowing me to translate her tutorials

Original Aqui

*


The author used the PSP 2020 to make this tutorial

The PSP X9 was used in the translation

*

Plugins:

G'MIC Plugins-QT - download

Mehdi / sorting Tiles

*

Material:


>All material was created by the author

*

Colors used in the original tutorial:


*


ROAD MAP


*

If you don't have the G'MIC-QT plugin, you can download it by clicking on the link above in the list of plugins


*

Click on the images to enlarge the size and improve the view. You can also copy the image and open it on PSP

*


01. Open a new image with 800 x 500px

Paint with this gradient:

(linear /45/3/invert unchecked)


02. Effects / Plugins / Mehdi / sorting tiles


03. Adjust / Add/Remove Noise / Add Noise


04. Copy the tube [viragom] and paste it as a new layer
No need to move

05. Effects / Plugins / G'MIC-QT / testing / Joan Rake / Deformations / Kaleidoscope Layer Cake


06. Layers/Duplicate

07. Activate the original layer - Raster 2
Effects / plugins / G'MIC-QT / Patterns / Hearts


08. Effects / Image Effects / Seamless Tiling - default


09. Layers/Duplicate

10. Effects / Image Effects / Seamless Tiling

11. Merge down
Drop shadow: 1 1 80 1 black

12. Merge visible

13. Put the color #e14d4c in the foreground
Effects / Plugins / G'MIC-QT / Frames / Frame(painting)
Save the image


14. Open the saved image and continue editing it
Selections / select all
Image / add borders / symmetric marked / 40 px / foreground color

15. Selections/Invert
Effects / Image Effects / Page Curl


16. Continue on the layer
Repeat Page curl with this new configuration


17. Selections / Promote selection to layer
Select none

18. Select the parts of the image shown in the print, with the Magic Wand configured as shown in the print, at the top


19. Effects / Texture Effects / Fur


20. Selections / Invert
Effects/Texture Effects/fur again - same setting


21. Select none
Copy the tube character[lánykám] and paste it as a new layer
Position on the right side according to the model

22.Adjust/sharpness/Sharpen
Drop shadow: 0 0 50 36 black

23. Copy the tube deco[díszem] and paste it as a new layer
Position according to the model

24. Merge All
Effects / Plugins / G'MIC-QT / frames / Frame (painting) / color=#e14d4c
Save the image


25. Open the saved image and continue editing it
Layers/duplicate
Image / Mirror / Mirror Horizontal

26. Image / Resize: 25% - all layers unchecked
Effects / Plugins / Mura's Meister / Copies


27. Activate the Pick Tool and configure: X=68 / y=126


28. Adjust / sharpness / sharpen more
Put your signature

29. Image / add borders / Symmetric marked / 2px / color #4b191a
Image / Resize: 900 x 615px - all layers checked
Save as jpeg


*

Thank you for doing my translation
I would love to receive a copy of your version to put on my photo
My email: email

*

Tutorial translated by Vera Mendes
Do not alter or repost without authorization from the author
01/12/2023


DIANA


Este tutorial é de Manyi a quem agradeço por permitir traduzir seus tutoriais

Tutorial Original Aqui


*


A autora usou o PSP 2020 para fazer esse tutorial

Na tradução foi usado o PSP X9

*

Plugins:

G'MIC Plugins-QT - download

Mehdi / sorting Tiles

*

Material:


>Todo o material foi feito pela autora

*

Cores usadas no tutorial original: 


*


ROTEIRO


*

Se não tiver o plugin G'MIC-QT você pode baixar, clicando no link acima, na lista de plugins


*

Clique nas imagens para aumentar o tamanho e melhorar a visualização. Você também pode copiar a imagem e abrir no psp

*


01. Abra uma nova imagem com 800 x 500px

Pinte com este gradiente:

(linear /45/3/invert desmarcado)


02. Effects / Plugins / Mehdi / sorting tiles


03. Adjust / Add/Remove Noise / Add Noise


04. Copie o tube [virágom] e cole como nova layer
Não precisa mover

05. Effects / Plugins / G'MIC-QT / testing / Joan Rake / Deformations / Kaleidoscope Layer Cake


06. Layers / Duplicate

07. Ative a layer do original - Raster 2
Effects / plugins / G'MIC-QT / Patterns / Hearts


08. Effects / Image Effects / Seamless Tiling - default


09. Layers / Duplicate

10. Effects / Image Effects / Seamless Tiling

11. Merge down
Drop shadow: 1  1  80  1  preto

12. Merge visible

13. Coloque a cor #e14d4c no foreground
Effects / Plugins / G'MIC-QT / Frames / Frame(painting)
Salve a imagem


14. Abra a imagem que foi salva e continue editando-a
Selections / select all
Image / add borders / symmetric marcado / 40 px / cor do foreground

15. Selections / Invert
Effects / Image Effects / Page Curl


16. Continue na layer
Repita o Page curl com essa nova configuração


17. Selections / Promote selection to layer
Select none

18. Selecione as partes da imagem mostrada no print , com a Magic Wand configurada conforme está no print, na parte superior


19. Effects / Texture Effects / Fur


20. Selections / Invert
Effects / Texture Effects / fur novamente - mesma configuração


21. Select none
Copie o tube personagem[lánykám] e cole como nova layer
Posicione no  lado direito conforme o modelo

22. Adjust / sharpness / Sharpen
Drop shadow: 0  0  50  36  preto

23. Copie o tube deco[díszem] e cole como nova layer
Posicione conforme o modelo

24. Merge All
Effects / Plugins / G'MIC-QT / frames / Frame (painting) / color=#e14d4c
Salve a imagem


25. Abra a imagem salva e continue editando-a
Layers / duplicate
Image / Mirror / Mirror Horizontal

26. Image / Resize: 25% - all layers desmarcado
Effects / Plugins / Mura's Meister / Copies


27. Ative a Pick Tool e configure: X=68 / y=126


28. Adjust / sharpness / sharpen more
Coloque sua assinatura

29. Image / add borders / Symmetric marcado / 2px / cor  #4b191a
Image / Resize: 900 x 615px - all layers marcado
Salve como jpeg


*

Obrigada por fazer minha tradução
Vou adorar receber uma cópia da sua versão para colocar no meu fotki
Meu e-mail: e-mail

*

Tutorial traduzido por Vera Mendes
Não altere e nem repasse sem autorização da autora
01/12/2023

MOTHER'S DAY 2024 - DENISE D - PORT

        Este tutorial é de Denise D a quem agradeço por me deixar traduzir seus tutoriais. * Original aqui * Tubes * ...