sábado, 9 de dezembro de 2023

KATARINA-ENGLISH


This tutorial is from Manyi who I thank for letting me translate her tutorials

*

Original - Aqui


*

Original tutorial made on PSP 2020
The translation was done on the PSP X9

*

Material


> Save the selection in the PSP's Selections folder

*

Plugins:
Eye Candy5: Impact / glass
Mehdi / sorting tiles
Graphic Plus / Cross shadow
Gmic-X86 3.2.0. - download

*

About the Gmic-X86 3.2.0 plugin.

> When activated it opens a window outside the psp, minimized in the psp taskbar
> Depending on the effect you apply, it will ask you to save the image. Then, open a folder next to the material to save;
> Every time you save an image in the gmic folder, open that image on the psp to continue working on it and delete the previous one that is open on the psp, unless the tutorial asks you to keep this image.
> I suggest that you write down the number of the saved image, to avoid opening another image unduly.
> If you have any difficulties using this plugin, please contact me: email


SCRIPT

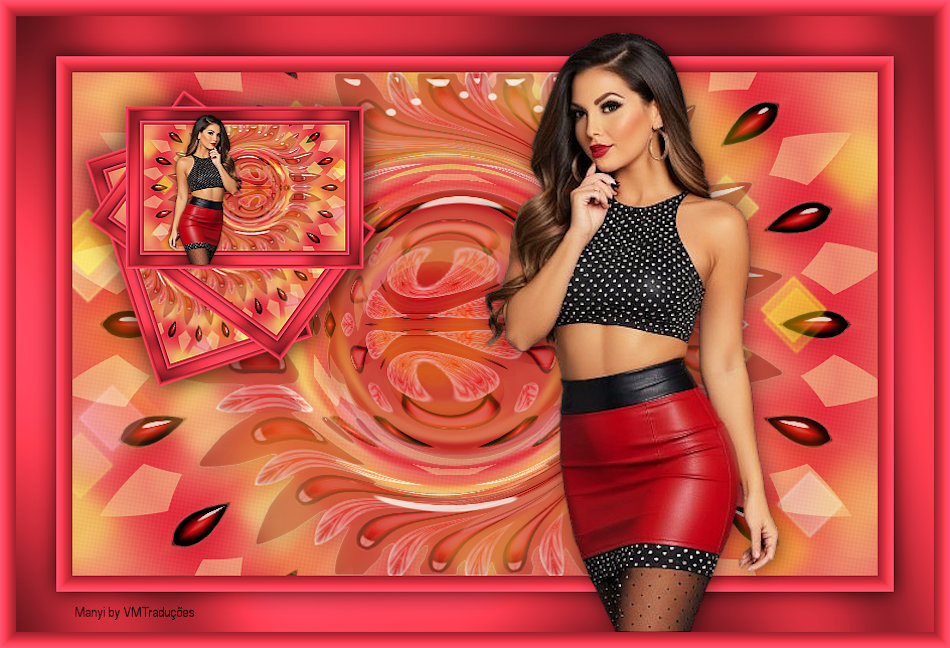
> click on the image to enlarge it

01. Colors used in the original tutorial:
Foreground: #376aa3
Background: #e1edf3

02. Open a new transparent image measuring 800 x 500px
Prepare this gradient and paint the image with it


03.Adjust/blur/Gaussian blur: 20


04. Effects / Plugins / Mehdi / Sorting tiles


05. Copy the tube deco [Díszem] and paste it as a new layer
No need to move
N.T.: You can colorize it according to your colors

06. Merge visible

07. Effects / Image Effects / Seamless tiling


08. Effects / reflection Effects / Kaleidoscope


09. Effects / Plugins / GMIC / GMIC-QT / Artistic / Bokeh


10.Effects / Plugins / GMIC / GMIC-QT / Deformations / Point warp


11. Selections / Load / Save Selections / Load selection from disk / Selection [katarina selections]


12. Effects / Artistic Effects / Halftone


13. selections / Invert

14. Effects / Plugins / eye Candy 5: Impact / glass


15.select none

16. Effects / Plugins / GMIC/GMIC-QT / Frames / Frame (painting) - color: #86acd3
Save the image in the gmic folder


17. Open the saved image and delete the previous one
Selections / Select all

18. Image / Add borders / symmetric marked / 40 px / color #86acd3

19. selections / Invert

20. Effects / Plugins / Graphic Plus / Cross shadow


21. selections / Invert

22. Drop shadow: 3 3 50 30 black

23. Repeat Drop shadow with negative V and H

24. Select none

25. Copy the tube character and paste it as a new layer
Activate the Pick tool and set = 465/0 (or according to your tube)


26.Adjust/sharpness/Sharpen

27. Drop shadow same as above or as you wish

28. Merge all

29. Effects / plugins / GMIC / GMIC-QT / Frames / Frame (painting) - color #86acd3
Save to the gmic folder


30. Open the saved image and delete the previous one
Layers/duplicate

31. Image/resize: 25% - all layers unchecked

32. Image / Mirror / Mirror Horizontal

33. Effects / Plugins / Mura's Meister / copies


34. Activate the Pick tool and configure: 84.00/89.00


35.Adjust/Sharpness/sharpen

36. Drop shadow same as above or as desired

37. Merge all

38. Image / Resize: 900 x 614px - all layers checked (optional)

39. Put your signature

40. Save as jpeg

*


Thank you for doing my translation
I would love to receive a copy of your work to put in the gallery

*


Tutorial translated by Vera Mendes
Do not alter or share without the author's permission
09/12/2023


KATARINA


Este tutorial é de Manyi a quem agradeço por me deixar traduzir seus tutoriais


*

Original - Aqui 


*

Tutorial original feito no PSP 2020

A tradução foi feita no PSP X9


*


Material


> Salve a seleção na pasta Selections do PSP


*


Plugins:

Eye Candy5: Impact / glass

Mehdi / sorting tiles

Graphic Plus / Cross shadow

Gmic-X86 3.2.0.  - download


*


Sobre o plugin Gmic-X86 3.2.0.


> Quando ativado ele abre uma janela fora do psp, minimizada na barra de tarefas do psp

> Dependendo do efeito que você aplicar, ele vai pedir para salvar a imagem. Então, abra uma pasta junto ao material para salvar;

> Toda vez que você salvar uma imagem na pasta gmic, abra essa imagem no psp para continuar trabalhando nela e delete a anterior que está aberta no psp, a menos que o tutorial peça para manter esta imagem.

> Sugiro que anote o número da imagem salva, para evitar abrir uma outra imagem indevidamente.

> Se tiver alguma dificuldade ao usar este plugin, entre em contato comigo: e-mail


ROTEIRO


> clique na imagem para aumentá-la


01. Cores usadas no tutorial original:

Foreground:  #376aa3

Background:  #e1edf3


02. Abra uma nova imagem transparente com 800 x 500px

Prepare este gradiente e pinte a imagem com ele


03. Adjust / blur / Gaussian blur: 20


04. Effects / Plugins / Mehdi / Sorting tiles


05. Copie o tube deco [Díszem] e cole como nova layer
Não precisa mover
N.T.: Você pode colorizar de acordo com suas cores

06. Merge visible

07. Effects / Image Effects / Seamless tiling


08. Effects / reflection Effects / Kaleidoscope


09. Effects / Plugins / GMIC / GMIC-QT / Artistic / Bokeh


10.Effects / Plugins / GMIC / GMIC-QT / Deformations / Point warp


11. Selections / Load / Save Selections / Load selection from disk / Selection [katarina selections]


12. Effects / Artistic Effects / Halftone

13. selections / Invert

14. Effects / Plugins / eye Candy 5: Impact / glass


15. select none

16. Effects / Plugins / GMIC/GMIC-QT / Frames / Frame (painting) - cor: #86acd3
Salve a imagem na pasta gmic


17. Abra a imagem salva e delete a anterior
Selections / Select all

18. Image / Add borders / symmetric marcado / 40 px / cor #86acd3

19. selections / Invert

20. Effects / Plugins / Graphic Plus / Cross shadow


21. selections / Invert

22. Drop shadow: 3  3  50  30  preto

23. Repita o Drop shadow com V e H negativos

24. Select none

25. Copie o tube personagem e cole como nova layer
Ative a Pick tool e configure = 465/0 (ou de acordo com o seu tube)


26. Adjust / sharpness / Sharpen

27. Drop shadow igual ao anterior ou como você desejar

28. Merge all

29. Effects / plugins / GMIC / GMIC-QT / Frames / Frame (painting) - cor #86acd3
Salve na pasta gmic


30. Abra a imagem salva e delete a anterior
Layers / duplicate

31. Image / resize: 25% - all layers desmarcado

32. Image / Mirror / Mirror Horizontal

33. Effects / Plugins / Mura's Meister / copies

34. Ative a Pick tool e configure: 84,00/89,00


35. Adjust / Sharpness / sharpen

36. Drop shadow igual ao anterior ou como desejar

37. Merge all

38. Image / Resize: 900 x 614px - all layers marcado (opcional)

39. Coloque sua assinatura

40. Salve como jpeg

*


Obrigada por fazer minha tradução
Adoraria receber uma cópia do seu trabalho para colocar na galeria
Mi correo electrónico: correo electrónico


*


Tutorial traduzido por Vera Mendes
Não alterar e nem compartilhar sem a autorização da autora
09/12/2023


MOTHER'S DAY 2024 - DENISE D - PORT

        Este tutorial é de Denise D a quem agradeço por me deixar traduzir seus tutoriais. * Original aqui * Tubes * ...