

This tutorial is from Manyi who I thank for allowing me to translate her tutorials
Original Aqui
*
The author used the PSP 2020 to make this tutorial
The PSP X9 was used in the translation
*
Plugins:
G'MIC Plugins-QT - download
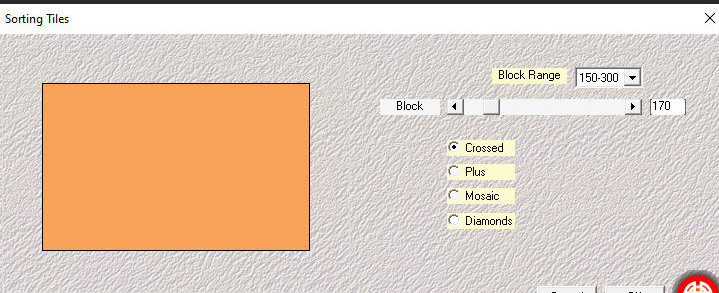
Mehdi / sorting Tiles
*
Material:


>All material was created by the author
*
Colors used in the original tutorial:

*
ROAD MAP
*
If you don't have the G'MIC-QT plugin, you can download it by clicking on the link above in the list of plugins
*
Click on the images to enlarge the size and improve the view. You can also copy the image and open it on PSP
*
01. Open a new image with 800 x 500px
Paint with this gradient:
(linear /45/3/invert unchecked)

02. Effects / Plugins / Mehdi / sorting tiles
03. Adjust / Add/Remove Noise / Add Noise

04. Copy the tube [viragom] and paste it as a new layer
No need to move
05. Effects / Plugins / G'MIC-QT / testing / Joan Rake / Deformations / Kaleidoscope Layer Cake

06. Layers/Duplicate
07. Activate the original layer - Raster 2
Effects / plugins / G'MIC-QT / Patterns / Hearts

08. Effects / Image Effects / Seamless Tiling - default

09. Layers/Duplicate
10. Effects / Image Effects / Seamless Tiling

11. Merge down
Drop shadow: 1 1 80 1 black
12. Merge visible
13. Put the color #e14d4c in the foreground
Effects / Plugins / G'MIC-QT / Frames / Frame(painting)
Save the image

14. Open the saved image and continue editing it
Selections / select all
Image / add borders / symmetric marked / 40 px / foreground color
15. Selections/Invert
Effects / Image Effects / Page Curl

16. Continue on the layer
Repeat Page curl with this new configuration

17. Selections / Promote selection to layer
Select none
18. Select the parts of the image shown in the print, with the Magic Wand configured as shown in the print, at the top


19. Effects / Texture Effects / Fur

20. Selections / Invert
Effects/Texture Effects/fur again - same setting

21. Select none
Copy the tube character[lánykám] and paste it as a new layer
Position on the right side according to the model
22.Adjust/sharpness/Sharpen
Drop shadow: 0 0 50 36 black
23. Copy the tube deco[díszem] and paste it as a new layer
Position according to the model
24. Merge All
Effects / Plugins / G'MIC-QT / frames / Frame (painting) / color=#e14d4c
Save the image

25. Open the saved image and continue editing it
Layers/duplicate
Image / Mirror / Mirror Horizontal
26. Image / Resize: 25% - all layers unchecked
Effects / Plugins / Mura's Meister / Copies

27. Activate the Pick Tool and configure: X=68 / y=126

28. Adjust / sharpness / sharpen more
Put your signature
29. Image / add borders / Symmetric marked / 2px / color #4b191a
Image / Resize: 900 x 615px - all layers checked
Save as jpeg
*
Thank you for doing my translation
I would love to receive a copy of your version to put on my photo
My email: email
*
Tutorial translated by Vera Mendes
Do not alter or repost without authorization from the author
01/12/2023
Sem comentários:
Enviar um comentário