

This tutorial is from Manyi who I thank for letting me translate her tutorials
*
Original - HERE
*
Tube: VM Tubes
*
Material


*
Colors used in the original version:

*
Plugins:
Graphics Plus-Cross Shadow
Mehdi-Sorting Tiles
Gmic Plugins-X86-3,2,0 - DOWNLOAD
*
Click HERE for more information about the GMIC plugin
SCRIPT
01. Open a new transparent image measuring 800 x 500px
Paint the image with this Linear gradient

02. Effects / Plugins / Mehdi / Sorting Tiles

03. Layers/Duplicate
04. Activate the Pick Tool / Drag the top part down to a height of 200px,
and the bottom part up to the height of 220px as shown in the print

05. Effects / Distortion Effects / Warp

06. Image / Mirror / Mirror Horizontal
Effects/Distortion Effects/Warp

07. Effects / Image Effects / offset=0/200/custom/transparent

08. Layers / duplicate
Image / Mirror / Mirror Vertical
09. Merge down
10. Layers/duplicate
Activate the middle layer - Copy of Raster 1
11. Effects / Plugins / GMIC/GMIC_QT/ Deformations / circle Transform

12. Activate the top layer
Merge down
Adjust/sharpness/Sharpen
13. Dop shadow: 1 1 100 0 color #63120f
14. Activate the bottom layer
Adjust / blur / Gaussian Blur=15

15. Continue on the layer
Copy and paste the landscape as a new layer
No need to move
16. Effects / Image Effects / Seamless Tiling

17. Activate the top layer
With the Magic Wand select the parts shown in the print

8. Activate the middle layer - Group - Raster 2
Adjust/Blur/Gaussian Blur:15

19. Effects / Texture Effects / Weave

20. Select none
21. Merge visible
22. Copy the foreground color code
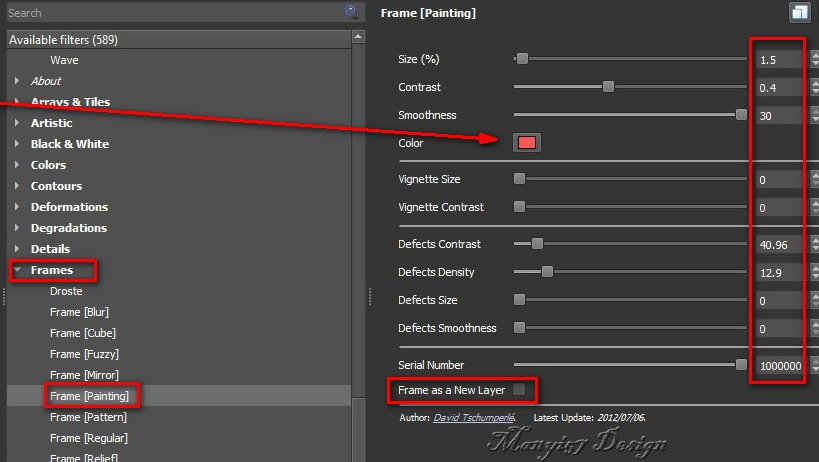
Effects / Plugins / GMIC/GMIC_QT/Frames / Frame Painting - color #f65857
Return to PSP
Save the image to the GMIC folder
23. Reserve the previous image to delete later
Open the new image saved in the GMIC folder
Selections / Select all
24. Image / add borders / 40px / color #f65857
25. Selections/Invert
26. Effects / Plugins /Graphic Plus / Cross shadow

27. Selections/Invert
28. Drop shadow: 3 3 40 20 black
29. Repeat Drop shadow with Negative V and H
30. Select none
31. Copy the tube deco[díszem] and paste it as a new layer
Do the same with the decos[díszem1] and [díszem2] tubs
32. Copy the tube character and paste it as a new layer
position to the right according to the model
If you use the material tube: Effects / Image Effects / Offset

Adjust / sharpness / sharpen
33. Drop shadow same as above
34. Merge all
35. Effects / plugins /GMIC/GMIC_QT / Frames / Frame (painting) - color: #f65857.

Save the image in the gmic folder
36. Book the before image
Open the new image that was saved in the gmic folder
Image / Resize: 900 x 609px - all layers checked (optional)
37. Put your signature
Save as jpeg
Sem comentários:
Enviar um comentário