This tutorial is from Manyi who I thank for letting me translate her tutorials.
*
Original - Aqui
*
Original tutorial made on PSP 2020
Translation done on PSP X9
*
Material
> you can find more decorative angel tubes here
*
Plugins
Gmic Plugins-X86-version 3,2,0 - download
Mehdi-Sorting Tiles
*
Click HERE to learn more about how the GMIC plugin works
SCRIPT
01. Colors used in the original version:
Foreground: #9cbcd1
Background: #ffffff
02. Open a new transparent image measuring 800 x 500px
Paint with this gradient:
Linear / 45/5/invert marked
03. Effects / Plugins / Mehdi / sorting tiles
Effects / edge Effects / enhance
04. Effects / plugins / GMIC / GMIC / Deformations / Kaleidoscope / (Reptorian-Polar)
05. Image / Mirror / Mirror Horizontal
Effects / Reflection Effects / rotating Mirror
06. Effects / Plugins / GMIC / GMIC / Deformations / Kaleidoscope (reptorian-Polar)
07. Copy the angel tube and paste as a new layer
No need to move
08. Activate the bottom layer - Raster 1
Layers/Duplicate
09. Activate the ruler: View / Rulers
Activate the Pick Tool
Drag the top down to a height of 50px
Drag the bottom part up to a height of 100px as shown in the print
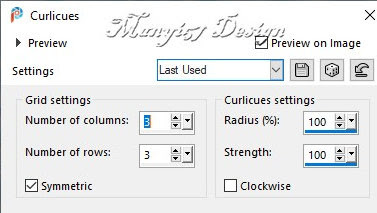
10. Effects / distortion Effects / Curlicues
11. Effects/ Image Effects / Seamless tiling
12. Continue with the Copy of Raster 1 layer
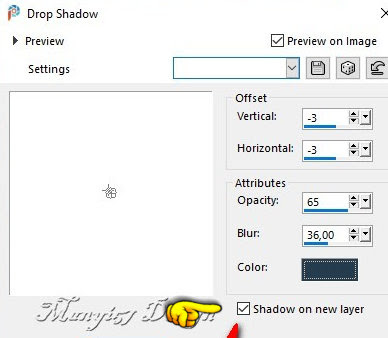
Drop shadow: -3 -3 65 36 - black -SHADOW ON NEW LAYER MARKED
13. Stay on the shadow layer
Effects / Plugins / Ap [Lines] / SilverLining
14. Merge Visible
Note the foreground color code
15. Effects / Plugins / GMIC/GMIC / Frames / Frame (Blur)
Save the image in the gmic folder
16. Open the image saved in the gmic folder
delete the previous image or reserve
Copy the little angel's decorative tube and paste it as a new layer,
No need to move
17. Copy the tube character and paste it as a new layer
Position it on the right side of the image according to the model or if using the tube provided: Effects / Image Effects / Offset:
18.Adjust/sharpness/sharpen
19. Drop shadow:0 0 65 36 black
20. Merge all
21. Effects / Plugins / GMIC/GMIC / Frames / Frame (blur)
Save the image in the gmic folder
22. Open the saved image
Image / resize: 900 x 605px - all layers checked (optional)
23. Put your signature and save as jpeg


Sem comentários:
Enviar um comentário