This tutorial is from Manyi who I thank for letting me translate her tutorials.
*
Original - Aqui
*
Material
*
Plugins:
Gmic Plugins-X86,3,2,0 - download
https://www.mediafire.com/file/hzetzx8uu6axp06/GmicPlugin+v3.2.0.rar/file
VM Distortion-Tilomat
AA Filters-Custom
Alien Skin-Eyecandy 5: Impact-Glass
*
Click HERE to learn more about how the GMIC plugin works
*
SCRIPT
01. Colors used in the original tutorial:
Foreground: #830f00
Background: #ff482a
02. Open a new transparent image measuring 800 x 500px
Paint with the foreground color
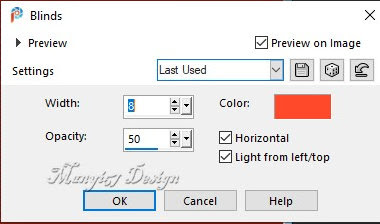
03. Effects / Texture Effects / blinds
N.T.: Pay attention to this effect: depending on the color you choose for the foreground, it does not appear
04. Effects / Plugins / Unlimited 2 /VM Distortion / Tilomat 2000
05. Activate the Selection Tool:
Selection type=rectangle / Mode=add(shift)/ Feather=0
Select as shown in the print
06. Copy (it will remain in memory)
07. Select none
08. Paste as new layer
No need to move
09. Effects / Plugins / GMIC -GMIC-QT / Testing / Lylejk / Lylejk Ripple
10. Effects / edge Effects / Enhance
11. Effects / Plugins / GMIC / GMIC-QT / Lights & Shadows / Drop shadows 3D
save the image in the gmic folder
12. Open the shadow image in the gmic folder
Copy
Activate raster layer 1
Stick the shadow / Do not move
13. Activate the top layer
Merge Down
14. Stay on the top layer
Effects / Plugins / GMIC / GMIC-QT / Testing / Joan Rake / Deformations / Kaleidoscope Layer Cake
Press delete on the keyboard
16. Select none
17. Selections / select All
18. Selections / float / Selections / defloat
19. Effects / Plugins / Eye Candy 5: impact / Glass
20. Select none
21. Effects / Plugins / GMIC / GMIC-QT / Lights & Shadows / Drop shadows 3D
Save the image in the gmic folder
22.Activate the Raster 1 layer
Open the shadow image saved in the gmic folder
Copy and paste as new layer
23. Activate the top layer
Merge Down
24. Still on the top layer
Effects / Plugins / GMIC / GMIC-QT / Testing / Joan Rake / Deformations / Kaleidoscope Layer Cake
25. Activate the Raster layer
Copy the landscape and paste as a new layer
Adjust the image by positioning it according to the model
26. Copy the text and paste as a new layer
Position on the right side according to the model
27. The layers will look like this:
28. Merge all
29. Effects / Plugins / GMIC / GMIC-QT / Frames / Frame (painting)
Save the image in the gmic folder
30. Open the saved image and close the previous one
Effects / Plugins / GMIC / GMIC-QT / Frames / Frame (painting)
Save the image in the gmic folder
31. Open the image and frame and close the previous image
32. Copy the frame and paste it into the image as a new layer
33. Activate the frame layer
Effects / Plugins / GMIC/GMIC-QT / testing / Samj/ Various / Test F
34. Layers / New Raster Layer
35. Layers / arrange / Send to bottom
Paint with one of the colors
36. Activate the top layer
Copy the tube character and paste as a new layer
37. Position on the left side
38. Drop shadow of your choice
39. Merge All
40. Effects / Plugins / GMIC/GMIC-QT / Frames / Frame (painting)
save the image in the gmic folder
41. (opcional)Effects / Plugins / AAA Filters / Custom/ Landscape
42. Image / Resize: 900 x 604px - all layers checked (optional)
43. Put your signature and save as jpeg


Sem comentários:
Enviar um comentário