

This tutorial is from Manyi who I thank for letting me translate her tutorials
*
Original - Here
*
Original tutorial prepared on PSP 2020
Translation on PSP X9
*
Material


*
Plugins
Gmic Plugins-X86- version 3.2.0.
Kang2-Luxury Cubes
MuRa's Meister-Copies
*
About the G'MIC Plugin:
> you can download it here - download
>Unzip the file to your plugins folder
>When you activate it, it shows a window outside the PSP, minimized in the Windows taskbar, just click on the icon and it maximizes it.
>Next to each effect, there is an arrow, which you just click and other effects appear.
> When making a tutorial that uses GMIC, open a folder in the material, with the name gmic or whatever you want. Some effects, after being applied, ask to save. Just save it in this folder and then open it on the PSP, as requested.
>Whenever you save an image with the effect applied in GMIC, always remember to open that image on the PSP immediately to continue editing it, as it will replace the other one that is still open on the PSP.
> It's always a good idea to also write down the last 6 numbers of the image that you will save in the gmic folder, to avoid opening the wrong image.
*
SCRIPT
01. Colors used in the original tutorial:
Foreground: #94e4ff
Background: #1d2645
02. Open a new transparent image measuring 800 x 500px
Color this image with the foreground color
03. Effects / Plugins / Unlimited 2 / Kang2 / Luxury Cubes
Print

04. Effects / Plugins / GMIC / GMIC-QT / Testing / Joan Rake / Deformations / Kaleidoscope Layer Cake
print

05. Effects / Plugins / GMIC / GMIC-QT / Frames / Gram(painting) / Foreground color
Save the image with the gmic effect in the gmic folder and write down its number so you don't open the wrong image later
print

06. Open the image and frame saved in the gmic folder
Copy the frame and paste it into the new saved image
Delete the frame and the previous image
07. Activate the frame layer
Effects / Plugins / GMIC / GMIC-QT / testing / Lylejk / Lylejk ripple
print

08. Layers / New Raster Layer
paint this layer with the background color
09. Layers / Arrange / Send to bottom
10. Merge Visible
11. Effects / Plugins / GMIC / GMIC-QT / Frames / Frame (Painting) - foreground color
Save the image with the gmic effect in the gmic folder and write down its number so you don't open the wrong image later
print

12. Open the image that was saved in the gmic folder
Delete the previous one that is still open on the psp
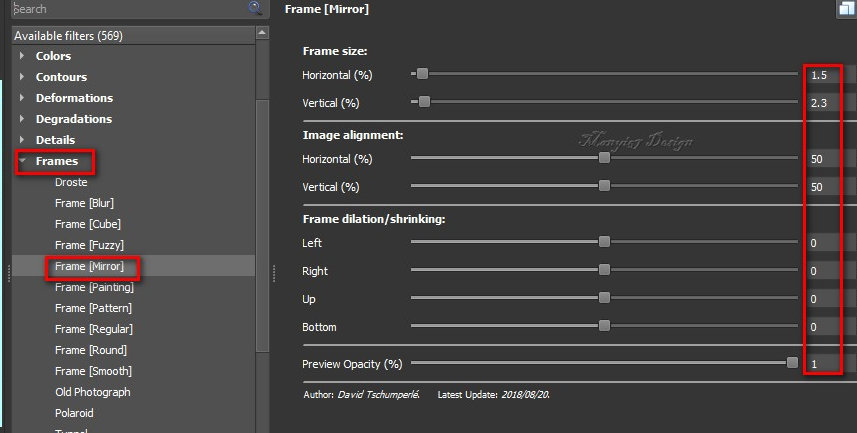
Effects / Plugins / GMIC / GMIC-QT/ Frames / Frame (Mirror)
Save the image with the gmic effect in the gmic folder and write down its number so you don't open the wrong image later
print

13. Open the image saved in the gmic folder
Delete the previous one that is still open on the psp
Effects / Plugins / GMIC / GMIC-QT / Frames / Frame (Mirror)
Save the image with the gmic effect in the gmic folder and write down its number so you don't open the wrong image later
print
14. Open the image saved in the gmic folder
Delete the previous one that is still open on the psp
Copy the tube deco [díszem] and paste it as a new layer
No need to move
Copy the tube deco [díszem 1] and paste it as a new layer
No need to move
15. Copy the tube character and paste it as a new layer
Position on the left side according to the model
16.Adjust/Sharpness/sharpen
17. Drop shadow of your choice
18. Merge all
19. Effects / Plugins / GMIC / GMIC-QT / Frames / Frame(painting)
Save the image with the gmic effect in the gmic folder and write down its number so you don't open the wrong image later
print

20. Open the image saved in the gmic folder
Effects / plugins / GMIC / GMIC-QT / polaroid
Save the image in the gmic folder

21. Open the image saved in the gmic folder
Image / Resize: 25% - all layers unchecked
22. Copy and paste into the previously created image (opened on psp)
23. Effects / Image Effects / Offset (240/90)

24. Effects / Plugins / Mura's meister / Copies

25.Adjust/sharpness/Sharpen
26. Drop shadow: 3 3 50 30 black
27. Repeat Drop Shadow with negative V and H
28. Merge All
29. Image / Resize: 900 x 604px - all layers framed
Put your signature
30. Save as jpeg
*
Thank you for doing my translation
I would love to receive a copy of your version to put in the gallery
My email: email
My email: veramendespsp2@gmail.com
*
Tutorial translated by Vera Mendes
Do not alter or share without the author's permission
06/12/2023
Sem comentários:
Enviar um comentário