This tutorial is from Manyi who I thank for letting me translate her tutorials
*
Original - Here
*
Plugins:
Graphics Plus-Cross Shadow
Gmic-X86 Plugins 3.2.0.
*
Material:
*
About the G'MIC Plugin:
> you can download it here - download
>Unzip the file to your plugins folder
>When you activate it, it shows a window outside the PSP, minimized in the Windows taskbar, just click on the icon and it maximizes it.
>Next to each effect, there is an arrow, which you just click and other effects appear.
> When making a tutorial that uses GMIC, open a folder in the material, with the name gmic or whatever you want. Some effects, after being applied, ask to save. Just save it in this folder and then open it on the PSP, as requested.
*
SCRIPT
1. Colors used in the original tutorial:
Foreground: #6e1516
Background: #e3c27b
2. Open a new transparent image measuring 800 x 500px
Paint with the foreground color
3. Selections / Select All
Copy the floral misted tube and paste it into the selection
4. Select none
5. Effects / Image Effects / Seamless Tiling - default
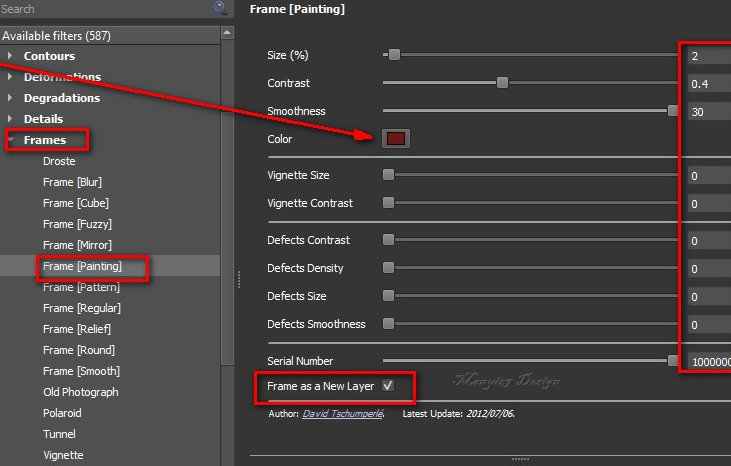
06. Effects / Plugins / GMIC / GMIC QT / Frames / Frame (Painting) - foreground color
Save to the gmic folder
N.T.: From now on, you need to pay more attention to your steps. There will be many repetitions of edges and with each edge, a new image will be formed that will replace the previous one. I advise you to save these images that are replaced and delete them after the tutorial is finished, so that the work area is not so "congested"
07. Open the image and frame saved in the gmic folder
Copy the frame and paste it into the image as a new layer;
N.T.: Now, as I said before, you can save the other two images in a folder to "clean up" the desktop so you don't get confused, or if you feel confident, you can delete them.
08. Activate the frame layer
Effects / Plugins / GMIC/GMIC-QT/ Pattern / Strips
09. Layers / New Raster Layer
paint this layer with the background color
10. Layers / Arrange / send to bottom
Activate the Raster 1 layer
11.Adjust / Blur / Gaussian Blur= 40
12. Continue on the Raster 1 layer
Effects/Plugins/mehdi/sorting Tiles
13. Merge visible
14. Effects /Plugins / GMIC / GMIC-QT / Deformations / kaleidoscope (reptorian-Polar)
15. Effects / Plugins / GMIC / GMIC-QT / Testing / Joan Rake / Deformations / kaleisdocope Layer Cake
16. Copy the tube deco from the material and paste it as a new layer
No need to move
17. Merge visible
18. Effects / plugins / GMIC/GMIC-QT / Frames / Frame (painting) - foreground color
Save to the gmic folder
19. Save the image that is open on the desktop, it will be used later (or minimize)
20. Open the framed image that was saved in the gmic folder
Effects / Plugins / GMIC/GMIC-QT/Frames / Frame (Painting) - foreground color
Save to the gmic folder
21. Open the saved image and frame
Copy the frame and paste it as a new layer on the image
You can delete the other two images or save if you feel insecure and continue working on the new image
22. Activate the frame layer
Selections / Select All / Selections / Float / Selections / Defloat
23. Layers / New Raster Layer
24. Copy the image reserved in item 19 and paste it into the selection
Layers/Properties/Opacity: 30%
25. Merge visible
Select none
26. Effects / Plugins / GMIC/GMIC-QT/ Frames / Frame (painting) - foreground color
Save to the gmic folder
27. Open the image saved in the gmic folder
N.T.: You can close the other framed image and keep the other (unframed) image minimized or saved and continue working on the new image
Selections / Select all
28. Image / Add borders / symmetric marked / 40px / any color
29. Selections/Invert
Paint with this Linear gradient (45/3/invert unchecked)
30. Effects/ Plugins / Graphic Plus / Cross shadow
31. Selections / Invert
Drop shadow: 3 3 50 30 black
32. Repeat Drop shadow with negative V and H
33. Select none
34. Effects / Plugins / GMIC / GMIC-QT / Frames / Frame (Painting) - foreground color
Save to the gmic folder
Open the image saved in the gmic folder
35. Effects / Plugins / GMIC / GMIC-QT / Frames / Frame (painting) - foreground color
Save to the gmic folder
36. Open the image and frame
Copy the frame and paste it as a new layer on the image
N.T: Delete the frame and the other previous image or save and work on this new one
37. Activate the frame layer
Select the frame with the magic Wand
Layers/New Raster Layer
38. Copy the image reserved in item 19
Paste into selection
39. Layers / Properties / Opacity: 30%
Select none
40. Merge visible
41. Effects / Plugins / GMIC / GMIC-QT / Frames / Frame (painting) - foreground color
Save the image in the gmic folder.
42. Open the saved image
Effects / Plugins / GMIC / GMIC-QT /Rendering / 3D Image Object
43. Open the saved image (the cube)
Copy and paste as new layer
Position on the left
44. Adjust / sharpness / sharpen
45. Drop shadow: 3 3 50 30 black
Repeat with negative V and H
46. Copy the tube character and paste it as a new layer
Position to the right according to the model
47.Adjust/sharpness/Sharpen
48. Drop shadow of your choice
49. Merge All
50. Image / Resize: 900 x 642px - all layers checked (optional)
51. Put your signature
52. Save as jpeg
*
*
Thank you for doing my translation
I would love to receive a copy of your version to put on my photo
My email: email
*
Tutorial translated by Vera Mendes
Do not alter or repost without authorization from the author
12/02/2023


Sem comentários:
Enviar um comentário